This is default featured post 1 title

Go to Blogger edit html and find these sentences.Now replace these sentences with your own descriptions.This theme is Bloggerized by Lasantha Bandara - Premiumbloggertemplates.com.

This is default featured post 2 title

Go to Blogger edit html and find these sentences.Now replace these sentences with your own descriptions.This theme is Bloggerized by Lasantha Bandara - Premiumbloggertemplates.com.

This is default featured post 3 title

Go to Blogger edit html and find these sentences.Now replace these sentences with your own descriptions.This theme is Bloggerized by Lasantha Bandara - Premiumbloggertemplates.com.

This is default featured post 4 title

Go to Blogger edit html and find these sentences.Now replace these sentences with your own descriptions.This theme is Bloggerized by Lasantha Bandara - Premiumbloggertemplates.com.

This is default featured post 5 title

Go to Blogger edit html and find these sentences.Now replace these sentences with your own descriptions.This theme is Bloggerized by Lasantha Bandara - Premiumbloggertemplates.com.

Showing posts with label Operating Systems. Show all posts

Friday, April 22, 2011

How to Run Linux from an USB Flash Drive


Ever wanted to have a portable operating system? One that can reside inside a small USB flash drive? In the past, it was possible to run a Linux distribution from an USB stick just like you would have run it from a Compact Disc, but this task was quite hard to achieve. Why? Simply because you had to type a lot of geeky commands in a terminal and if, somehow, you forgot one or typed something wrong, the whole process had to be started all over again. Not to mention that it could take about 1-2 hours to make a bootable USB stick. Therefore, this guide is here to teach you some new Linux magic tricks on how to achieve a portable Linux operating system, in no more than 5 minutes! How? With the help of a great and marvelous tool called UNetbootin.

For this tutorial, we've used Ubuntu 8.04.1 LTS and BackTrack 3 Linux distributions, both tested with an 1GB Kingstone DataTraveler 2.0 USB flash drive.

Things you need:

- One of the supported Linux distributions of your choice:

· Arch Linux
· BackTrack
· CentOS
· CloneZilla
· Damn Small Linux
· Debian
· Dreamlinux
· Elive
· FaunOS
· Fedora
· FreeBSD
· FreeDOS
· Frugalware
· Gentoo
· Gujin
· Kubuntu
· Linux Mint
· Mandriva
· NetBSD
· NTPasswd
· openSUSE
· Ophcrack
· Parted Magic
· PCLinuxOS
· Puppy Linux
· Slax
· SliTaZ
· Smart Boot Manager
· Super Grub Disk
· Ubuntu
· Xubunu
· Zenwalk

- Minimum 1GB USB flash drive

Step 1 - Download UNetbootin
CODE
http://linux.softpedia.com/get/System/Installer-Setup/UNetbootin-33779.shtml


Ok, so all you have to do is grab the UNetbootin executable from here, and save it on your desktop.

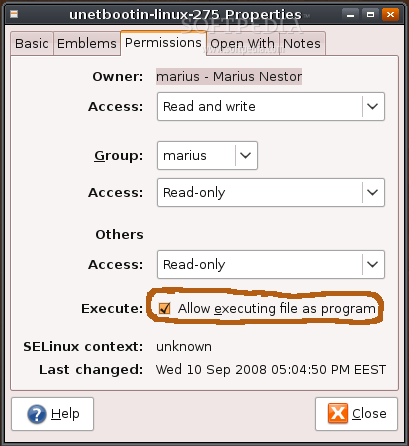
Right click on it and go to Properties...


Review image


Now, click the third tab (Permissions) and check the box in front of the "Allow executing file as program" option...

Review image


Close the Preferences window!

Step 2 - Execute UNetbootin and create your portable Linux distribution

First of all, insert the USB stick in an empty port (this is very important, because you will not be able to use the USB stick if you insert it after you've opened the UNetbootin application).

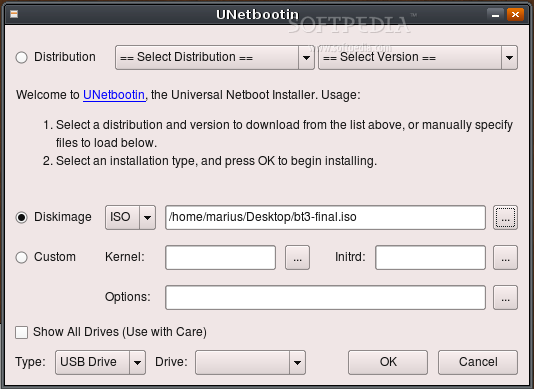
Double click the UNetbootin executable, type your password, and it will open. All you have to do now is to select your favorite Linux distribution and the preferred version/edition, and begin the process. Alternatively, you can download the ISO image of the Linux distribution that you want to make portable, and use it in UNetbootin for an ultra fast process!

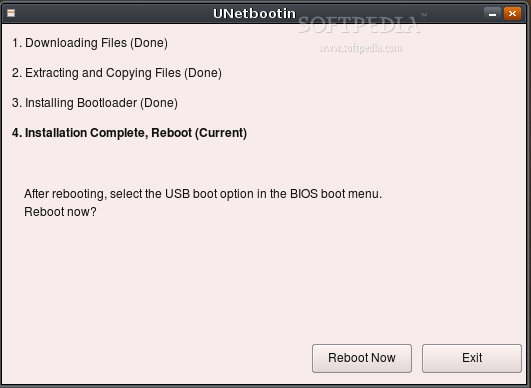
In the following example we've used a BackTrack 3 ISO image and installed it on an USB stick with UNetbootin. The whole process took about 5 minutes to complete:

Review image


Review image


Review image


That's it! Reboot your machine and boot from the USB stick. Have fun with your brand new portable Linux operating system!

Source:

CODE
http://news.softpedia.com/news/How-to-Run-Linux-from-an-USB-Flash-Drive-93316.shtml

Download WiFi Slax Wireless Hacking Live-CD v3.1 + Plugins Updated


WiFi Slax Wireless Hacking Live-CD v3.1 + Plugins Updated

WEP is an encryption scheme, based on the RC-4 cipher, that is available on all 802.11a, b and g wireless products. WEP uses a set of bits called a key to scramble information in the data frames as it leaves the access point or client adapter and the scrambled message is then decrypted by the receiver. Both sides must have the same WEP key, which is usually a total of 64 or 128 bits long. A semi-random 24 bit number called an Initialization Vector (IV), is part of the key, so a 64 bit WEP key actually contains only 40 bits of strong encryption while a 128 bit key has 104. The IV is placed in encrypted frames header, and is transmitted in plain text.

Traditionally, cracking WEP keys has been a slow and boring process. An attacker would have to capture hundreds of thousands or millions of packets? a process that could take hours or even days, depending on the volume of traffic passing over the wireless network. After enough packets were captured, a WEP cracking program such as Aircrack would be used to find the WEP key.

Basic Directions:

1)Boot from cd
2)Get the wep key
3)Write it down
4)Reboot into windows
5)Connect using wep key.

...............................................................................................................................................................

Activate Windows 7,RemoveWAT 2.2.5.2 - [A safer activation solution]

RemoveWAT 2.2.5.2 - [A safer activation solution]RemoveWAT 2.2.5.2 - [A safer activation solution] | 7Mb
This is a little tool put together to remove WAT (Windows Activation Technologies) completely from the OS, whilst still retaining genuine status and receiving all updates (optional as well). You can also pass the genuine check in things like WindowsDefender. There will be no windows activation section in control panel. No nags, no prompts, nothing. WAT gone.

Information about the file:
Name: RemoveWATVersion: 2.2.5.2Year: 2010Interface: Englishcrack: Not needSize: 7 mbFormat: .exe

RemoveWAT 2.2.5.2 - [A safer activation solution]

RemoveWAT 2.2.5.2 - (A safer activation solution) (Enjoy!)

Download Windows 8 Ultimate Xtreme Edition x86 (2010) | 2.45 GB

Download Windows 8 Ultimate Xtreme Edition x86 (2010) | 2.45 GB

What is Windows 8 xTreme?
Windows 8 xTreme its a System based on Windows 7 FiNal

* Windows 8 xTreme doesn't have any components removed from Original Windows 7 Image so you wont lose any compatibly with software, hardware or miss any stuff at all.
* Windows 8 xTreme its a Clean Windows 7 Image with a compilation of the best tweaks and a new integrated look ... keeping all new features like superbar, etc ...
* Windows 8 xTreme has been tested in a real machine with a compilation of over 200 softwares ...
* All default applications are silently installed before StartUp ...

Tweaks:
* UAC Disabled
* Take Ownership
* Show File Extensions
* Automatic Defragmentation with Diskeeper
* New Cmd File to Right Click
* Enabled Search System Folders in Search
* ClearType
* Windows Will Tell You Exactly What it is Doing When it is Shutting Down or is Booting
* Increase Network Throughput
* ... many tweaks for IE8
* ... many more tweaks for W7 ...

Design:
* New Windows 7 Themes
* New Start Button
* New Cursor 3D
* New Hd Wallpapers
* New Hd System Icons Integrated In System
* New User *** Pics
* New Windows Scheme Sounds
* New Logon Screen
* ... and more

Extra Toos Integrated In System:
* SPTD

Extras:
* Cursor Fx + Cursor 3D (separate optional)
MD5: DDCD1F82FBA14134537F63E00C9E51BC

DOWNLOAD HERE:

Download MacOS 9.2.2 Boot CD eMac G4 100% Compatible

Mac-OS 9.2.2 Boot CD (e Mac G4 100% Compatible)


This is MacOS 9.2.2, release in December 2001. MacOS 9.2.2 is the last version of MacOS based on the original Macintosh operating system.

Please note: this isn't a install CD. This is custom bootable CD with fully working MacOS 9.2.2.

This disk contain two folders:
1) Applications (some original apps and Toast 5)
2) System Folder (system folder)

To install, drag and drop System Folder to hard disk. There should be Apple OS9 driver installed while partitioning the hard disk.

This disk is made specially for eMac G4 800 Mhz (Ati Graphics version) and 100% compatible. This model of eMac won't boot this CD if you change internal CD-ROM to custom DVD-ROM.

Download :

MacOS Snow Leopard 10.6 Build 10A380 6.32GB

MacOS Snow Leopard 10.6 Build 10A380 6.32GB


With Snow Leopard, the next major version of the world’s most advanced operating system, Mac OS X changes more than its spots, it changes focus.
Taking a break from adding new features, Snow Leopard builds on Leopard’s enormous innovations by delivering a new generation of core software technologies that will streamline Mac OS X, enhance its performance, and set new standards for quality. Snow Leopard dramatically reduces the footprint of Mac OS X, making it even more efficient for users, and giving them back valuable hard drive space for their music and photos.Snow Leopard will not work on PPC units. As of this writing, it will only work on Intel Macs!


!!! VERY IMPORTANT !!!
The computer you are going to install Snow Leopard on MUST be setup with the GUID partitioning scheme. The external HDD can be anything as this is just booting for the install, but the actual drive in which you are installing Snow Leopard onto must be setup with the GUID partitioning scheme.


!! Instructions External HDD Method !!
Tested and Works


* On your external USB or Firewire HDD, create a 10GB Mac OS X Extended partition, format this partition and leave it blank. You will need this later on.
* Download all 71 parts from RapidShare
* Join with Ajoiner to get a single .DMG file
* Mount the .DMG file
* Using Disk Utility, Select the RESTORE Tab
* Right Click on the "Mac OS X Install DVD" and select it as the SOURCE
* Right Click on your USB/Firewire 10GB Partition and select it as DESTINAION
* Check off "Erase Destination"
* Click Restore
* Wait for Restore to complete
* Once restore is complete, you will notice that your 10GB Partition name is called "Mac OS X Install DVD"
* Unmount the Disk Image
* LEAVE THE USB/FIREWIRE DRIVE CONNECTED
* Restart your Mac and hold the Option Key to get the startup disk menu
* Select the External HDD, Labelled "Mac OS X Install DVD"
* Booting from the External HDD works and it's fast!! Anytime you want to install Snow Leopard on any Intel Mac Computer, all you need to do is bring your External Drive, connect it, reboot and install.


!! Instructions DVD Method !!
Untested. Not sure if this works as I use the External HDD Method


* Download all 71 parts from RapidShare
* Join with Ajoiner to get a single .DMG file
* Mount the .DMG file using Disk Utility
* Using Disk Utility, create a new dual layer (8.5GB) sparse image called snowleopard (actual filename will be snowleopard.sparseimage)
* Mount this new sparse image file
* Restore the SnowLeopard Install DVD you downloaded from RapidShare to the newly created mounted snowleopard.sparseimage (not the image file.)
* Open the mounted snowleopard.sparseimage with Finder, and delete the XCodeTools directory.
* Unmount the mounted snowleopard.sparseimage.
* Using the Disk Utility, create a new single layer (4.4GB) spare image called snowleopardboot (actual filename will be snowleopardboot.sparseimage) and mount it.
* Restore the snowleopard.sparseimage image file to the mounted snowleopardboot.sparseimage (not the image file.)
* Unmount the mounted snowleopardboot.sparseimage.
* Burn the snowleopardboot.sparseimage to your single layer DVD media.
* Booting from this DVD works, but takes a very long time.


Following the WWDC '09 keynote address delivered by Apple’s SVP of Worldwide Product Marketing, the existence of a new developer build of Snow Leopard was reported. The build, labeled 10A380, shows UI enhancements, on top of the newly announced features and changes.


MacRumors now reports that Michael Flux has posted an extensive gallery of screenshots highlighting some key changes in Snow Leopard. According to the two sources, those include:
– Stacks Navigation: Navigation within Stacks from the Dock using Grid view has been changed from previous developer builds. Whereas previous builds allowed users to navigate folder hierarchies using small icon versions of parent folders, Build 10A380 now utilizes text buttons in the upper left corner for navigation to parent folders.
– Safari Contextual Menu Options: Apple has added two new contextual menu options within Safari. When selecting and right clicking on any text within Web pages, Safari now offers the ability to easily create new Mail Notes from the selected text or convert the selected text to speech and have the file added to iTunes.
– AirPort Menu Signal Strength Indicators: The AirPort Menu Item now shows signal strengths for all networks within range without having to join the networks, aiding in network selection in locations with many possible choices.


Additional findings include an icon for Folder Actions Setup, which is now available in the menu; some minor updates to the Language options; a refreshed Input Sources preferences; updated Keyboard Shortcuts; easier ways to navigate through and find what you need; Mail.app and Font Book load blazing fast.


It has also been reported that the very build of Snow Leopard we are discussing has been leaked on torrent sites. Softpedia does not condone piracy, and encourages Mac users to wait for the public release of the software. Apple has announced low upgrade prices for Mac fans, something you may want to check out before you do anything hasty.


MacOS Snow Leopard 10.6 Build 10A380 6.32GB


How to install Mac OS X Snow Leopard 10A380


Step 1: First of all, obviously you need to acquire the .DMG (disk image) file. If you are an Apple Developer Connection Premiere, or Select member, you can download the .DMG file directly from Apple's Developer Connection website.


If you know of any ways to get it otherwise, please do not post any links as I will be forced to remove them. I don't care if you're talking among yourselves on the subject but please keep it to a minimum.


Step 2: With this .DMG file you can do one of
two things. You can either, burn it to a dual layer DVD (thats the 8.5GB kind - you need it because the .DMG won't fit on a standard 4.7GB DVD) and from there proceed to install it like you would usually install an OS when you bought it in a store. OR you can install it directly from a hard drive. I personally prefer the second method, but will explain both.


Step 3a: If you choose to go down the the DVD-burning route, you need to do the following. First of all, open Disk Utility, which can be found under /Applications/Utilities/, click on the yellow 'Burn' icon in the toolbar, find and select the .DMG file and click 'Burn'. Now just wait a few minutes until the disk is burned and verified and after that is done, you're ready to proceed to Step 4


MacOS Snow Leopard 10.6 Build 10A380 6.32GB


Step 3b: Now, I personally much prefer using this method when installing new operating systems. Not only are you not wasting the relatively expensive dual layer DVDs, but also with this method the installation time can be cut down in half. What you need is an external USB or Firewire hard drive which you can use "instead" of the DVD during your installation. A usb stick/thumb drive will also work as long as its large enough to fit the .DMG file. Before proceeding, back up any data you have on the external hard drive as you will now format it and in turn erase everything.


When you're done backing up anything you had on the external hard drive, open Disk Utility just like in Step 3a, select your external hard drive from the list in the sidebar, click on the 'Erase' tab, from the drop down menu select 'Mac OS Extended Journaled' and click 'Erase'.


MacOS Snow Leopard 10.6 Build 10A380 6.32GB


After you erased the external hard drive, click on the 'Partition' tab, and from the drop down menu under 'Volume Scheme' select '1 Partition'*. Now click on the 'Options' button and form there, select 'GUID Partition Table'. This will allow you to boot from the hard drive you're currently preparing.


MacOS Snow Leopard 10.6 Build 10A380 6.32GB


* One note I must make is that if this external hard drive is large enough (30GB or more) you can not only use it for the Installer, but also to install Snow Leopard onto it and then boot directly from this hard drive and use it as you would use your internal one if you were to install an OS on it.


If you do want to do this, simply select '2 Partitions' from the drop down menu, and resize one of them to 10GB, this will be the partition used for the Installer, the rest of the hard drive will be dedicated to the operating system itself.


After you're done with all of the above, click 'Apply' and wait for Disk Utility to properly partition your hard drive.


Now click on the 'Restore' tab. Locate your .DMG file and drag it onto the 'Source' field, either from within Disk Utility, or from Finder. From the sidebar grab the partition you prepared for the installer and drag it to the 'Destination' field. Check the 'Erase destination' checkbox and click 'Restore'. Thats it. Now sit back, and wait for the process to finish.


MacOS Snow Leopard 10.6 Build 10A380 6.32GB


Step 4: Now its time to boot up. No matter which direction you went in in step 3, what you need to do now is the following. Shut down and power on or restart your Mac. Right after you hear the startup chime, before the Apple logo appears on the screen, press and hold the 'alt' key. Keep holding it until the icons for your hard drives (and optical media, if inserted) appear on the screen. From here select either the disk which you just burned or the hard drive to which you just restored the .DMG. Now that you've selected and clicked one one of the choices, wait for the Inst[/img]aller to boot and then follow the directions which are, I think, quite self explanatory.


Download Link :
http://hotfile.com/dl/44703220/e5dbf30/Sno...part01.rar.html
http://hotfile.com/dl/44703221/730dbb3/Sno...part02.rar.html
http://hotfile.com/dl/44703222/abdd5e0/Sno...part03.rar.html
http://hotfile.com/dl/44703223/b8a4c42/Sno...part04.rar.html
http://hotfile.com/dl/46198803/99d041a/Sno...part05.rar.html
http://hotfile.com/dl/44703224/01885ba/Sno...part06.rar.html
http://hotfile.com/dl/44703225/eb01265/Sno...part07.rar.html
http://hotfile.com/dl/44703226/e35c899/Sno...part08.rar.html
http://hotfile.com/dl/44703227/b75d009/Sno...part09.rar.html
http://hotfile.com/dl/44703228/957c262/Sno...part10.rar.html
http://hotfile.com/dl/44703229/a7ec1fb/Sno...part11.rar.html
http://hotfile.com/dl/44703230/eaf5bf8/Sno...part12.rar.html
http://hotfile.com/dl/44703231/971beaa/Sno...part13.rar.html
http://hotfile.com/dl/44703232/5a9295b/Sno...part14.rar.html
http://hotfile.com/dl/44703233/d1e5931/Sno...part15.rar.html
http://hotfile.com/dl/44703234/d4a2ca4/Sno...part16.rar.html
http://hotfile.com/dl/44703235/d0b138a/Sno...part17.rar.html
http://hotfile.com/dl/44703236/c6279e7/Sno...part18.rar.html
http://hotfile.com/dl/44703237/3871ba9/Sno...part19.rar.html
http://hotfile.com/dl/44703238/f939bd0/Sno...part20.rar.html
http://hotfile.com/dl/44703239/21a5082/Sno...part21.rar.html
http://hotfile.com/dl/44703240/78aa678/Sno...part22.rar.html
http://hotfile.com/dl/44703241/9692e4b/Sno...part23.rar.html
http://hotfile.com/dl/44703242/a22a20e/Sno...part24.rar.html
http://hotfile.com/dl/44703243/b1862cd/Sno...part25.rar.html
http://hotfile.com/dl/44703244/942dbcc/Sno...part26.rar.html
http://hotfile.com/dl/44703245/c8b10e7/Sno...part27.rar.html
http://hotfile.com/dl/44703246/ac08e96/Sno...part28.rar.html
http://hotfile.com/dl/44703247/eccd595/Sno...part29.rar.html
http://hotfile.com/dl/44703248/d4c16e9/Sno...part30.rar.html

Google Operating System 2010 (Android LiveCD - No Instalation)

LiveAndroid lets you download a disk image LiveCD operating system Google Android. Just record the image on the disc, placing it in the CD-ROM drive and restart your computer and you can test Android, without installing it and not touching any files on your computer.


 Language: English
File: ISO
Size: 172.46 Mb
Checksums
MD5 E0C5C305F78CD958DBAEA3716C82296F
SHA-1 741B42748666AC085FC12692AC6AFB369B002A2E
CRC32 EEDBFF00

Windows XP NASA Second Generation SP3 2010 (New Links)

WINDOWS XP


Windows XP NASA Second Generation SP3 2010 (New Links)


Windows XP NASA Second Generation SP3 2010 (New Links)


Now The Second Generation from Windows XP NASA SP3 2010 comes with New Exclusive Technology .. Used for the first time.. it "Automatic Recovery for Basic System Files in every Windows Boot" or "Self Maintenance" .. This means .. in every time windows reboot .. all basic system files will recover automatically as if windows installed for first time without affecting the programs and other files and without taking additional time!!

That's Amazing!! More use for the Windows increase the speedy and stability .. Windows XP NASA Second Generation SP3 2010 very fast, fully stable, NO system errors, High Internet speed . More developments and improvements for all features and functions of the previous edition "XP NASA SPACE v1.0 SP3 2010" VGA clarity, sound effects, Graphics and Multimedia, New 3D Themes Multi Color, Icons, 3D Wallpapers and Transparency.

Release Name: Windows XP NASA Second Generation SP3 2010
System: Windows XP Professional SP3 English Original MSDN x86
Year: 2009
Language: English
CD Key: Already Slipstreamed Original Key
Activation: Already activated
Install method: Unattended
File format: ISO
Size: 697 MB
Bootable
Integrated latest updates and hotfixes
Accept updates form microsoft

Programs Added: (You can stop installation of any program don't need it)
River Media centre (for 3D Multimedia)
yahoo messenger 10
Yahoo multi messenger
Firefox 3.5
Flash player 10
Fire Tune
Winrar 3.8
K lite kodec 5.1.8
Winamp 5.5.6 with 3D skins
.Net framework 2
Stardock Icon pacakger
Xoft spy Full (last edition)
clean unistaller
Dp projection
Madotate
Rocket Dock
True transperncy
Ubericon
Yzshadow
and more...

Apperance:
25 New 3D Themes (Multi Color) with icons, sounds and wallpapers
70 New 3D Wallpapers (High Resolution)
Windows 7 logon screen (optional.. you can change it)
Startup Screens: (optional.. you can change it)
Ubuntu linux apperance
Windows 7 apperance
Mac OS apperance
and more..


Twitter Delicious Facebook Digg Stumbleupon Favorites More